
Trong quá trình phát triển ứng dụng web bằng Laravel, một trong những công cụ mạnh mẽ và hữu ích mà bạn sẽ thường xuyên sử dụng là Laravel Artisan. Vậy Laravel Artisan là gì? Hãy cùng tìm hiểu chi tiết về công cụ này trong bài viết dưới đây.
Tổng quan về Laravel Artisan
Laravel Artisan là giao diện dòng lệnh đi kèm với Laravel. Nó giúp bạn thực hiện nhiều tác vụ phức tạp một cách nhanh chóng và tiện lợi. Với Artisan, bạn có thể tự động hóa các công việc hành chính trong ứng dụng, quản lý cơ sở dữ liệu, thực hiện các thao tác với model, controller và nhiều chức năng khác mà không cần viết quá nhiều mã.
Tại sao bạn nên sử dụng Laravel Artisan?
- Tiết kiệm thời gian: Với Artisan, bạn có thể nhanh chóng tạo ra các file cần thiết cho dự án mà không cần phải viết mã thủ công.
- Tổ chức tốt hơn: Artisan giúp bạn thực hiện các lệnh theo cách có tổ chức, giúp dễ dàng quản lý dự án.
- Tính năng mở rộng: Bạn có thể tạo các lệnh Artisan tùy chỉnh để phục vụ nhu cầu cá nhân và nhóm phát triển.
Các lệnh cơ bản trong Laravel Artisan
Một trong những điểm nổi bật của Artisan là bạn có thể xem danh sách các lệnh có sẵn. Để xem danh sách này, bạn chỉ cần chạy lệnh sau trong terminal:
php artisan list
Lệnh này sẽ hiển thị tất cả các lệnh có sẵn, bao gồm các lệnh liên quan đến bảo trì, cơ sở dữ liệu, cache và nhiều hơn nữa.
Một số lệnh thông dụng
- clear-compiled: Xóa file lớp đã biên dịch.
- migrate: Chạy các migration.
- serve: Chạy ứng dụng trên máy chủ phát triển PHP.
- tinker: Tương tác với ứng dụng của bạn qua REPL.
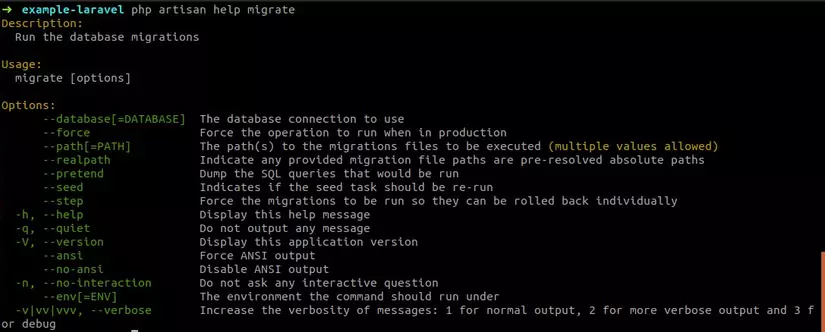
Để xem mô tả chi tiết về một lệnh, bạn có thể sử dụng lệnh help, ví dụ:
php artisan help migrate
Lệnh này sẽ giúp bạn hiểu rõ hơn về cách dùng và các tùy chọn có sẵn cho lệnh migrate.
Giao diện dòng lệnh REPL trong Laravel
REPL là gì?
REPL (Read-Eval-Print Loop) là một môi trường để tương tác với mã, cho phép bạn thực hiện các đoạn mã PHP ngay lập tức và nhận phản hồi. Khi sử dụng Laravel, bạn có thể truy cập REPL thông qua lệnh:
php artisan tinker
Điều này rất hữu ích để kiểm tra các đoạn mã nhỏ hoặc thực hiện các thao tác trực tiếp trên model mà không cần phải xây dựng một phương thức hay controller.

Tính năng của Tinker
- Tương tác nhanh chóng: Bạn có thể chạy lệnh ngay lập tức mà không cần phải tạo file.
- Kiểm tra mô hình: Tinker cho phép bạn thực hiện các thao tác trực tiếp trên các model của ứng dụng.
- Hỗ trợ môi trường phát triển: Tinker giúp bạn xử lý nhanh các vấn đề ngay trên môi trường phát triển mà không cần đến các công cụ phức tạp.
Tạo các lệnh Artisan tùy chỉnh
Ngoài các lệnh có sẵn, bạn cũng có thể tạo các lệnh Artisan của riêng mình để phục vụ cho các nhu cầu đặc thù của dự án.
Cách tạo lệnh Artisan
Để tạo một lệnh mới, bạn có thể sử dụng lệnh make:command, ví dụ:
php artisan make:command SendEmails
Lệnh này sẽ tạo ra một file command mới trong thư mục app/Console/Commands. Bạn có thể mở file này và tùy chỉnh nó theo ý muốn.
Cấu trúc của lệnh
Mỗi lệnh Artisan sẽ bao gồm một số thuộc tính và phương thức như sau:
- $signature: Chứa tên và tham số của lệnh.
- $description: Mô tả ngắn gọn về lệnh.
- handle(): Phương thức sẽ được gọi khi lệnh được thực thi.
Một ví dụ đơn giản về lệnh gửi email có thể như sau:
Đăng ký lệnh Artisan
Sau khi tạo xong lệnh, để lệnh này có thể sử dụng được, bạn cần đảm bảo nó được đăng ký trong file app/Console/Kernel.php. Bạn cần thêm lệnh vào thuộc tính $commands.
protected $commands = [
    Commands\SendEmails::class,
];
Sau đó, bạn có thể sử dụng lệnh vừa tạo như bất kỳ lệnh Artisan nào khác.
Định nghĩa tham số lệnh Artisan
Cách định nghĩa tham số
Tham số của lệnh được định nghĩa trong thuộc tính $signature. Bạn có thể chỉ định tên tham số và giá trị mặc định cho nó.
Ví dụ:
protected $signature = 'user:create {userType} {numberOfUser=1}';
Khi đó, bạn có thể gọi lệnh như sau để tạo 20 người dùng có quyền quản trị:
php artisan user:create admin 20
Cách xử lý tham số trong lệnh
Trong phương thức handle() của lệnh, bạn có thể lấy giá trị của tham số bằng cách sử dụng phương thức argument(). Điều này giúp bạn dễ dàng thực hiện các thao tác dựa trên tham số đầu vào.
Kết luận
Laravel Artisan là một công cụ rất mạnh mẽ và hữu ích trong quy trình phát triển ứng dụng với Laravel. Nó không chỉ giúp bạn tiết kiệm thời gian và công sức mà còn tăng độ tổ chức và khả năng mở rộng của dự án. Bằng cách tận dụng các lệnh có sẵn và tạo ra lệnh tùy chỉnh, bạn có thể dễ dàng tối ưu hóa quy trình phát triển của mình. Theo dõi Hoclaravel.vn để cập nhật những kiến thức về Laravel mới nhất!